Manage groups
Groups are the primary method to manage permissions in the FGA Dashboard. Instead of assigning permissions to each member individually, you create groups and assign them roles. Each group can have one or more roles, and members added to a group automatically inherit all of the group's roles and store access.
Groups allow you to manage access for all members of an entire team simultaneously. For example, you can create a "Dev Team" group with Store Editor access to your development stores, and every member added to that group receives the same permissions.
The one exception is the Account Owner role, which is assigned directly to individual members rather than through a group.
Who can manage groups?
- Account Owners can create, edit, and delete groups, and manage group membership.
- Group Managers can create, edit, and delete groups, and manage group membership, with certain restrictions to prevent privilege escalation.
- Store Editors and Store Viewers cannot manage groups.
Create a group
- Navigate to Account > Groups.
- Select Create New Group.
- Enter a Name and Description for the group.
- Under Roles, select one or more roles to assign to the group. The available roles are:
- Group Manager: An account-level role. Members can manage groups and group membership but do not have direct access to stores.
- Store Editor (includes Store Viewer): A store-level role. When selected, a store dropdown appears where you select which specific stores this role applies to.
- Store Viewer: A store-level role. When selected, a store dropdown appears where you select which specific stores this role applies to.
- Click Create.
For a full description of what each role can do, see Roles and Permissions.
Example: Create a Group Manager group
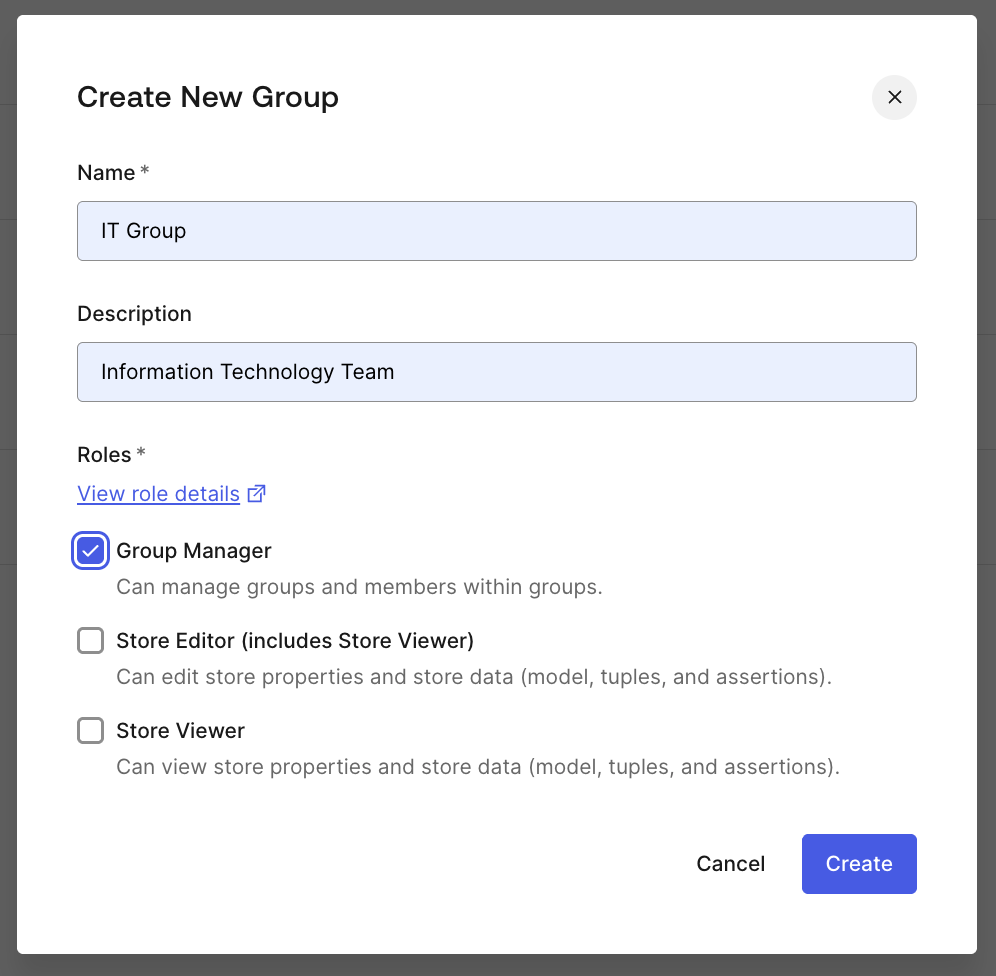
To create a group for IT administrators who manage teams but do not need direct store access:
- Navigate to Account > Groups and select Create New Group.
- Enter the name "IT Group" and the description "Information Technology Team".
- Under Roles, select Group Manager.
- Click Create.
Members added to this group can invite members to the account, create and manage other groups, and manage group membership. They do not have access to any stores.
Scope roles to specific stores
Store-level roles (Store Editor and Store Viewer) can be scoped to individual stores. This gives you fine-grained control over which stores each group has access to.
When you select the Store Editor or Store Viewer role during group creation or editing, a store selection dropdown appears. Select the specific stores this role should apply to. You can select multiple stores.
Key points about store scoping:
- Store Editor includes Store Viewer: If you assign Store Editor for a set of stores, members automatically have read access (Store Viewer) to those same stores. You do not need to separately assign Store Viewer for stores where a member already has Store Editor access.
- Multiple roles in one group: A single group can have both Store Editor (for some stores) and Store Viewer (for other stores). For example, Store Editor for your staging store and Store Viewer for your production store.
- Multiple group membership: A member can belong to multiple groups. Their effective permissions are the combination of all roles from all groups they belong to.
- Group Manager and store roles: A single group can combine Group Manager with store-level roles if needed, though it is common to keep account-level and store-level roles in separate groups for clarity.
- New stores are not automatically added to existing groups: When new stores are created, groups with Store Editor or Store Viewer roles do not automatically gain access to the new stores. An Account Owner or Group Manager must update the group that needs access to the new store.
Example: Create a Store Editor group with store scoping
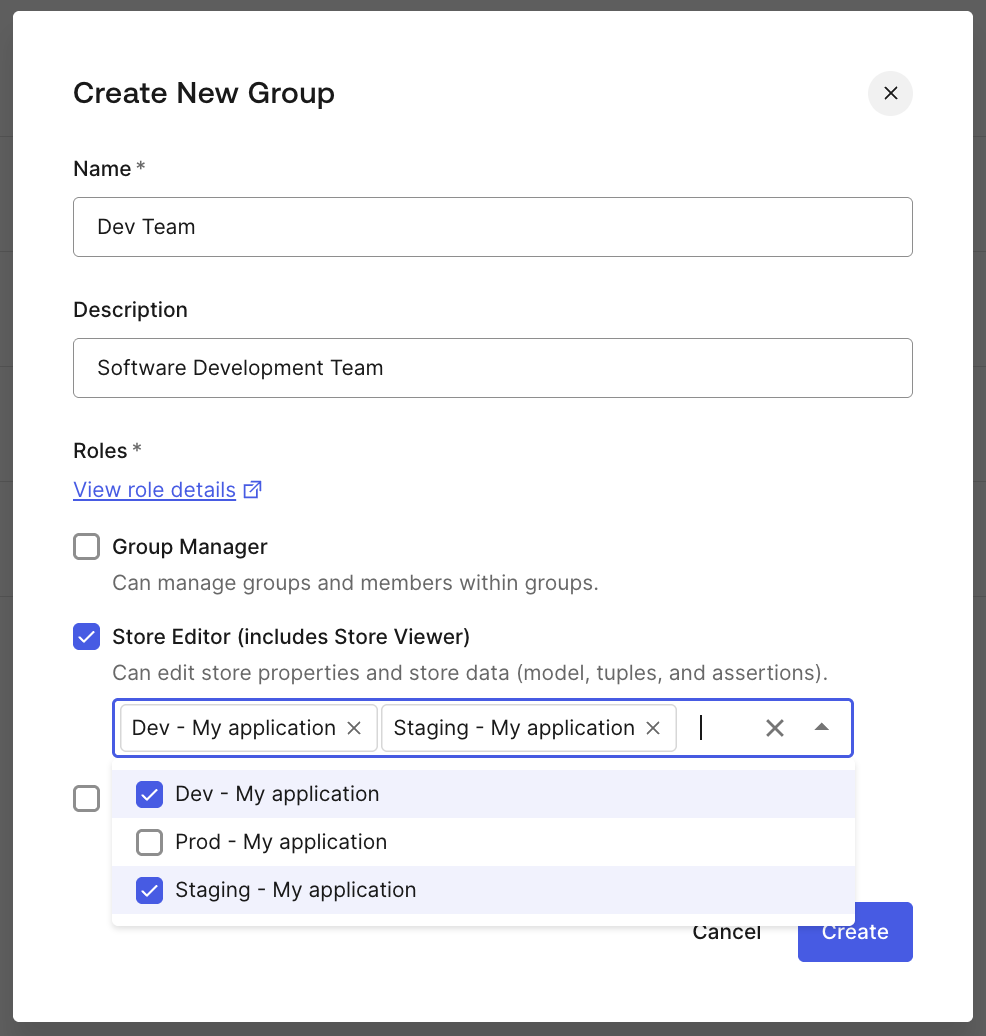
To create a group for a development team that needs write access to specific stores:
- Navigate to Account > Groups and select Create New Group.
- Enter the name "Dev Team" and the description "Software Development Team".
- Under Roles, select Store Editor (includes Store Viewer).
- In the store dropdown that appears, select the stores this role applies to (e.g., "Dev - My application", "Staging - My application").
- Click Create.
Members added to this group can create and update authorization models, write relationship tuples, add assertions, run queries, and perform other editor actions in the selected stores.
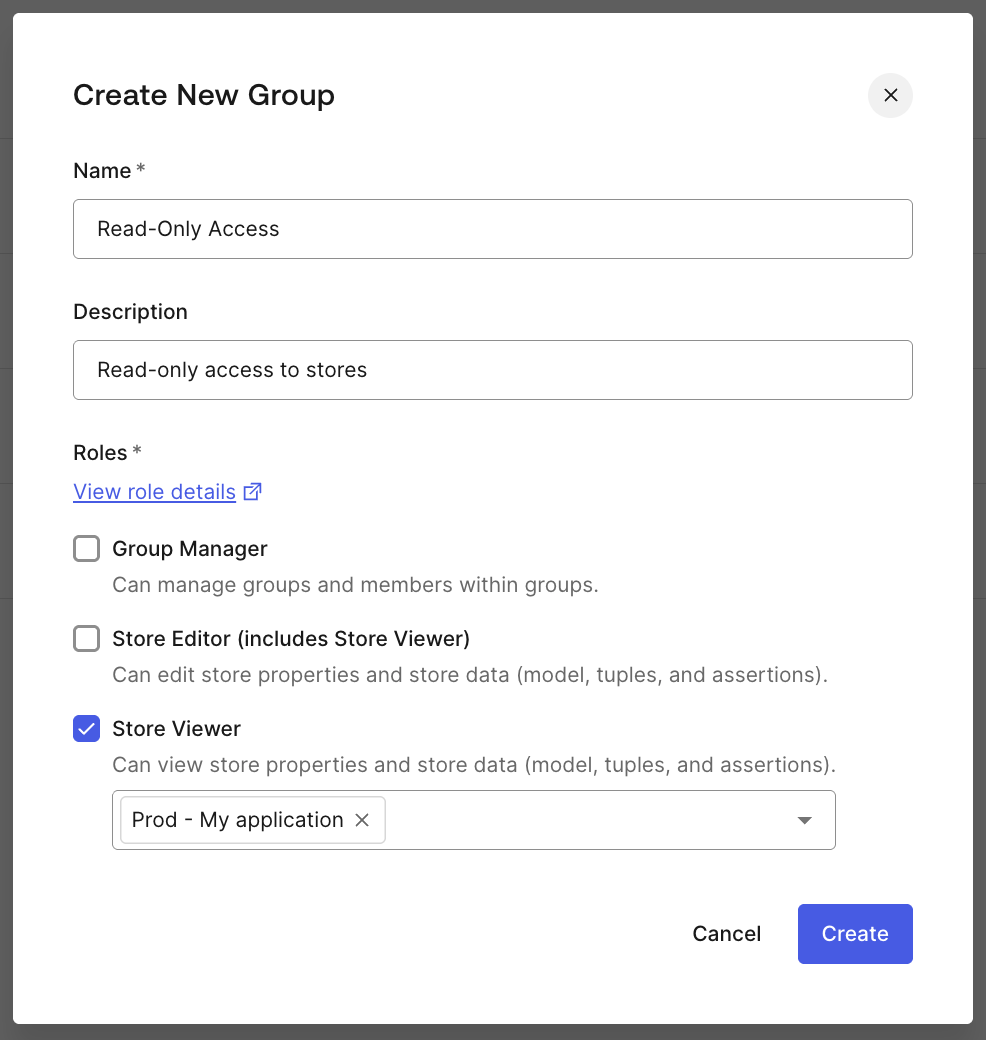
Example: Read-only access to a store
The following shows a group named "Read-Only Access" with only the Store Viewer role, scoped to a production store. Members of this group can view store data but cannot make any changes.
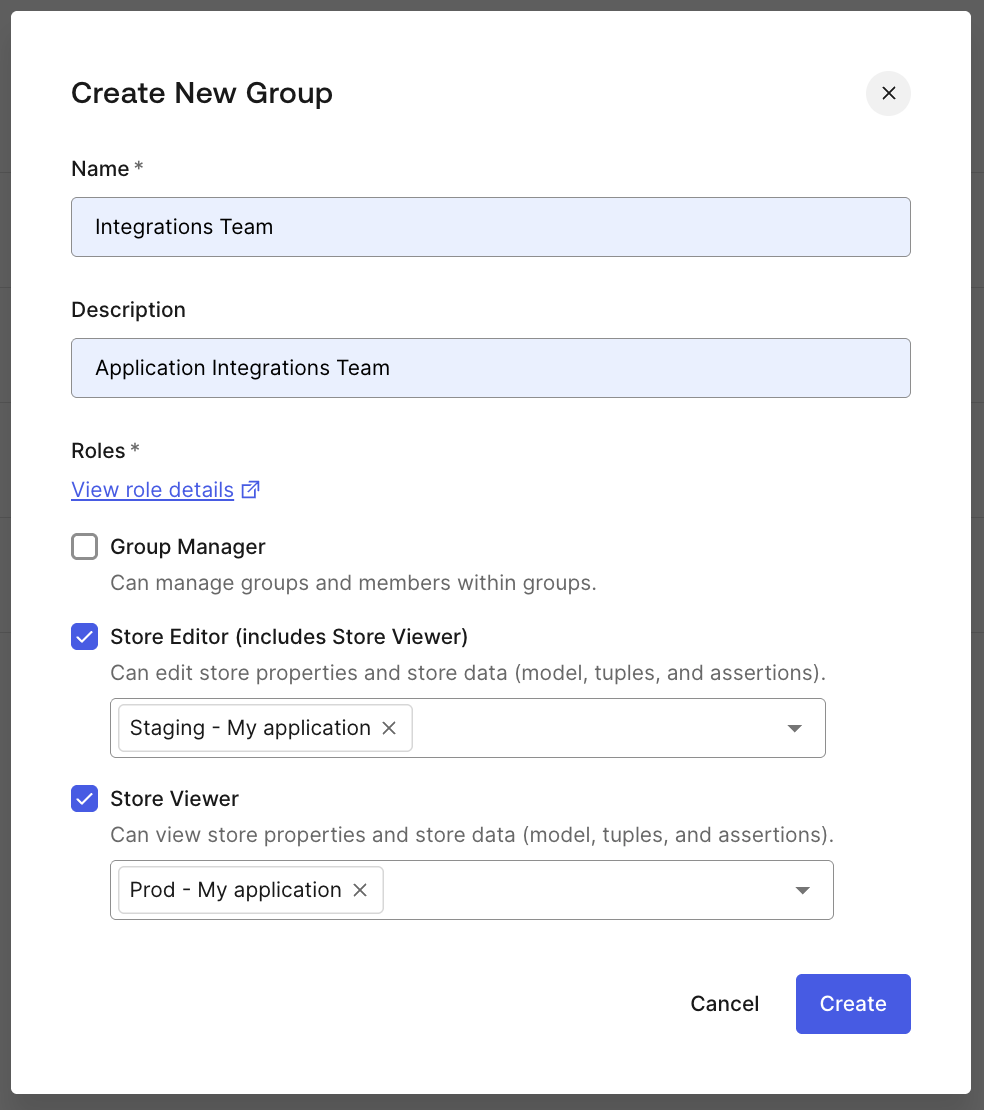
Example: Mixed access across stores
The following shows a group named "Integrations Team" with the Store Editor role scoped to a staging store and the Store Viewer role scoped to a production store. Members can make changes in staging while having read-only visibility into production.
Edit a group
Only Account Owners and Group Managers can edit groups. To edit a group:
- Navigate to Account > Groups.
- Find the group you want to edit and click the menu button at the end of the group row.
- Select Edit.
You can update the following:
Edit name and description
Change the group's name or description to reflect its current purpose. Group names must be unique within the account.
Change roles and permissions
Add or remove roles assigned to the group. When adding or removing store-level roles (Store Editor or Store Viewer), you can also change which specific stores the role applies to using the store dropdown.
Add and remove members
Add members to the group so they inherit its roles and store access, or remove members to revoke that access. Members immediately inherit roles when added and immediately lose them when removed (unless they receive the same access through another group).
Members must first be invited to the account before they can be added to a group.
Group Manager restrictions when editing groups
Group Managers have certain restrictions when editing groups to prevent privilege escalation. For example, a Group Manager cannot add themselves to a group. They can only add other members, as managing membership for others is their primary function. An Account Owner or another Group Manager must add them.
For the full list of Group Manager restrictions, see Constraints and guardrails in Roles and Permissions.
Delete a group
To delete a group:
- Navigate to Account > Groups.
- Find the group and click the menu button at the end of the group row.
- Select Delete and confirm.
A group that still has members cannot be deleted. You must remove all members from the group before deleting it.
Pre-configure groups
Groups can be created with no members. They must have at least one role. This supports a pre-configuration workflow where administrators set up the group structure before adding members.
- Empty groups (no members): Create a group and assign it roles without adding any members. Members can be added later. This is useful when setting up team structures in advance.
Limits
- Maximum 20 groups per account.
- Group name: 3 to 64 characters, required, must be unique within the account.
- Group description: 0 to 100 characters, optional.
- Allowed characters for group name and description: letters (A-Z, a-z), digits (0-9), period (
.), hyphen (-), underscore (_), and space.